How to make a light box...
I have been whinging a lot lately mostly to myself, but it has really gotten to me and without hiding it any longer I have to admit it has really been getting me down.
You see there are so many wonderful blogs out there with fantastic DIY projects and shoots that look wonderful, perfect lighting, props etc ...
In comparison mine look terrible. I mean even the last photo I added of our 'Save the Dates' I am not at all happy with. The lighting is so freaking dark I just want to scream.
Anyway, last night I spent my very first evening with a load of brunches from Blog Brunch. My did I learn a lot about staging and styling.
It was there that I was reminded that I need to make myself a DIY lightbox to really get the best of shoots that feature small objects like stationary ...
I am so excited to get started on this project.
Here are the instructions from the Digital Photography School
DIY Light Box
What you need ...
a. BOX - Make sure to find a box that is fairly big and one that is square.
b. FABRIC - Source two white extra large t-shirts. Be certain to make sure they are as white as possible so that you get the right effect.
c. TAPE - Purchase regular masking tape to attach the fabric to the box.
d. GLUE - You can use a glue stick or adhesive spray to stick the lining inside the box.
e. CARD - Buy two big sheets of white card.
f. LIGHTS - Lighting is the most important part of the box, without it you will not get the effect you are looking for. Hop on down to IKEA and get a standard desk lamp, which is cheap and will do the trick.
g. TOOLS - Ruler, scissors and Stanley knife.
Instructions ...
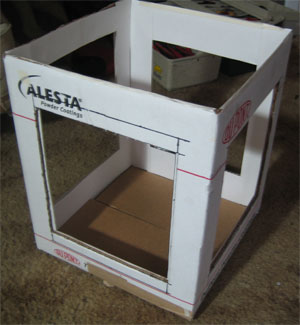
Take your box with a tape ruler and measure in 2" from the side of the box marking multiple points with your ruler. When you are done you will see your border, connect your points with a straight long ruler. You should be looking at a nice square in the middle of the box with a 2" border. Leave the top and bottom of the box as you will not need to mark it.
Cut out the boxes you have drawn on all four sides. When you are done remove the flaps from the top of the box, but remember to LEAVE THE BOTTOM and it should hopefully look like this ...
Take your card and mark lines with your marker of 2", sixteen times. Then cut out the 16 strips with your scissors.
Next take the strips and glue them into your box {make sure the side with the marker goes against the box so that it cannot be seen}.
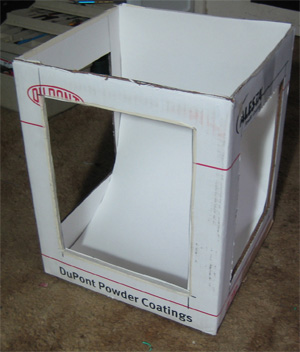
Now take another sheet of white card and cut it so that it is the same size width as the inside of the box and the length much longer than the box.
Place this long piece of card into the box allowing the card to curve towards the bottom of the box. AVOID creasing the card as it will show up once the box is lit.
Cut off the excess card that is sticking out at the top of the box. Like so ...
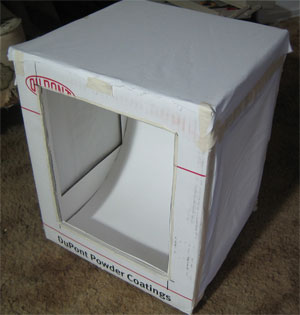
Take your extra large white t-shirts and cut them to a size that will allow you to cover the 2 side holes. Make sure to cut a bigger piece for the top of the box.
Tape the fabric to cover the holes on the outside of the box except the one that is facing the background {this is the window for the camera}. Lastly, tape the larger piece to the top.
and et voila that's it.
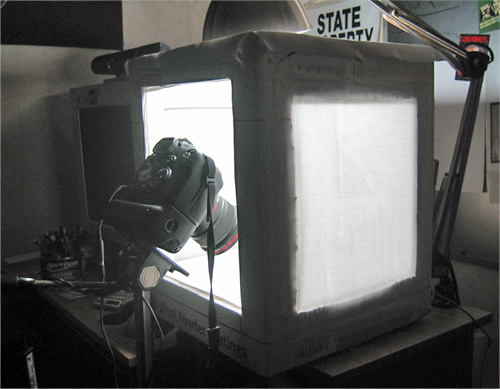
Now you can take your lamp and shine it over the top. Style your scene then start shooting.
Images via digital photography school
It's as easy as that apparently. So I must get my sweet butt down over to IKEA or Argos to get hold of my lamp and then I am all set.
Can't wait to share some of the pictures that I will be taking.
Have a lovely Sunday.
Love Chrissi xo
5 comments:
I never thought about making my own light box before. What a great idea! Look forward to seeing your photos
Oh, this is fantastic. I've been wanting to make a light box and now I know how. Right now I've just been trying to find bright corners in my home for photos... lol! Thanks for sharing the tutorial!! :)
What a great idea!
What a cool idea! Thanks for the post!
I'm a new follower, and I'm loving your blog so far! Can't wait to read more from you!
I'd absolutely love if you followed back! You can find me at What's in a Name?
I am sure most people have heard of it, but I thought a reminder (which is what I needed) of the idea was a good thing ... maybe other people like myself are struggling capturing their treasures in the right light ? And a proper flash is faaaaaaar too expensive :(
Love Chrissi xo
Post a Comment