Wednesday, October 10, 2012

My 31st Birthday Party...


This year I kept my birthday rather casual. I didn't plan on anything spectacular 
partly due to the fact that I have a lot of things in the making at the moment and I am spending most of my time focusing on a number of these goals.

So a few of my close friends and I ended up spending the evening at a sweet little Italian restaurant in the heart of London's West End. And although I was rather ill with a flaming cough and head cold I still had a wonderful evening for which I am truly grateful; thanks guys for the terrific presents !!

BTW ... I arranged the flowers. Do you like them ?
I thought they turned out pretty well and fit perfectly with the decor. Can you believe that I had never visited this particular Zizzi branch before ... lol lucky I guess that the flowers were the exact same colours as the chairs and menus hahaha ... Luck I guess !

Hope you are all enjoying your week ?

Love Chrissi xo

Sunday, October 7, 2012

How to make a light box...

I have been whinging a lot lately mostly to myself, but it has really gotten to me and without hiding it any longer I have to admit it has really been getting me down.

You see there are so many wonderful blogs out there with fantastic DIY projects and shoots that look wonderful, perfect lighting, props etc ...
In comparison mine look terrible. I mean even the last photo I added of our 'Save the Dates' I am not at all happy with. The lighting is so freaking dark I just want to scream.

Anyway, last night I spent my very first evening with a load of brunches from Blog Brunch. My did I learn a lot about staging and styling

It was there that I was reminded that I need to make myself a DIY lightbox to really get the best of shoots that feature small objects like stationary  ... 

I am so excited to get started on this project.

Here are the instructions from the Digital Photography School

DIY Light Box

What you need ...

a. BOX -  Make sure to find a box that is fairly big and one that is square.

b. FABRIC  - Source two white extra large t-shirts. Be certain to make sure they are as white as possible so that you get the right effect.

c. TAPE - Purchase regular masking tape to attach the fabric to the box.

d. GLUE - You can use a glue stick or adhesive spray to stick the lining inside the box.

e. CARD - Buy two big sheets of white card.

f. LIGHTS - Lighting is the most important part of the box, without it you will not get the effect you are looking for.  Hop on down to IKEA and get a standard desk lamp, which is cheap and will do the trick.

g. TOOLS - Ruler, scissors and Stanley knife.

Instructions ...

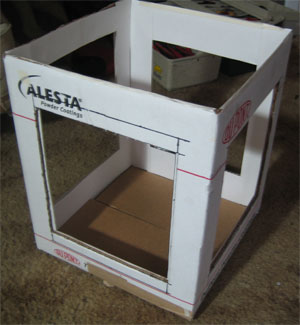
Take your box with a tape ruler and measure in 2" from the side of the box marking multiple points with your ruler. When you are done you will see your border, connect your points with a straight long ruler. You should be looking at a nice square in the middle of the box with a 2" border. Leave the top and bottom of the box as you will not need to mark it.

Cut out the boxes you have drawn on all four sides. When you are done remove the flaps from the top of the box, but remember to LEAVE THE BOTTOM and it should hopefully look like this ... 


Take your card and mark lines with your marker of 2", sixteen times. Then cut out the 16 strips with your scissors. 
Next take the strips and glue them into your box {make sure the side with the marker goes against the box so that it cannot be seen}.

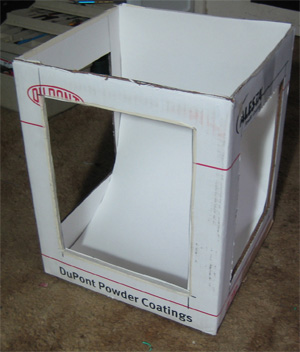
Now take another sheet of white card and cut it so that it is the same size width as the inside of the box and the length much longer than the box.
Place this long piece of card into the box allowing the card to curve towards the bottom of the box. AVOID creasing the card as it will show up once the box is lit.
Cut off the excess card that is sticking out at the top of the box. Like so ...


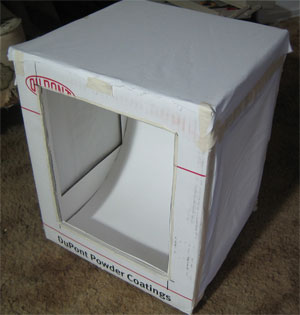
Take your extra large white t-shirts and cut them to a size that will allow you to cover the 2 side holes. Make sure to cut a bigger piece for the top of the box.

Tape the fabric to cover the holes on the outside of the box except the one that is facing the background {this is the window for the camera}. Lastly, tape the larger piece to the top.


and et voila that's it.

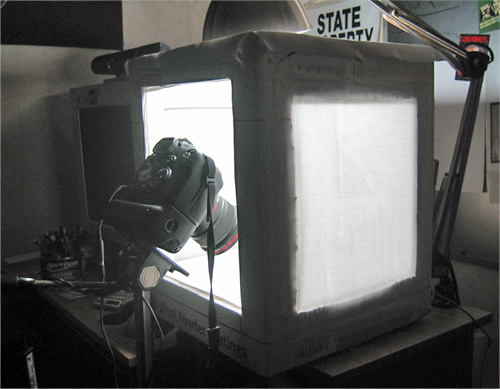
Now you can take your lamp and shine it over the top. Style your scene then start shooting.


It's as easy as that apparently. So I must get my sweet butt down over to IKEA or Argos to get hold of my lamp and then I am all set. 

Can't wait to share some of the pictures that I will be taking.

Have a lovely Sunday.

Love Chrissi xo

Friday, October 5, 2012

Save the Dates ...

Finally, we have our Save the Dates out to both our family and friends here in England and in France and I can't tell you how happy I am.

I looked at so many ideas all over the internet and saw some pretty wonderful 
and exciting ideas that were truly spectacular. Gosh if you haven't heard of pinterest yet then may I suggest that you get on over there right now to be wooed ?!

With so many great ideas in mind we were able to decide upon a theme... whoopee and yes the best thing is that they reflect us as a couple and I am so so so happy with the result .... You see Eddy and I love to organise dinner for family and friends and whipping up something truly scrumptious for dessert usually has my heart singing for joy. 

So I hoped and prayed that a photo shoot of Eddy and I holding a delicious cake {of course baked by my own hands} would turn out as well as I had planned.

And I think they did. What do you think ?


(Source: myownpic)


I especially love the fact that they look so sweet in transparent envelopes wrapped with twine ... oh and not forgetting the little added touch of a heart awwwww 

Have a truly wonderful weekend !

Love Chrissi xo

PS. For added interest. We are soon going to launch a new service on With Passion and Love.

So stay tuned !


Monday, September 24, 2012

Planning my ideal birthday party ...

Preparing for my birthday party is always a big thing for me every year. It's not just that I enjoy the gifts lol {which of course I do hahaha}, but it's mostly about enjoying a fabulous evening with close friends and family.

Decoration is always top of my list in getting ready for a party and as always pinterest offers some great inspiration.


(source: pinterest)


(source: pinterest)


(source: pinterest)


Yes there is a theme appearing here, an orange, pink, navy and gold one in fact. Colours, that I find fresh and bright, colours that will add create interest to a dimly lit restaurant with wooden tables and orange chairs.
Flowers are a must and the gold spray painted mason jars are so fabulous, I must have these. Balloons, I am thinking of getting too, but I am just wondering if it might be a little over the top for a party in a restaurant ?!

ARE YOU LOVING THESE COLOURS AS MUCH AS I AM RIGHT NOW ?!

Have a wonderful week !

Love Chrissi xo

Monday, August 27, 2012

Simple Pizza Recipe 


You have had a busy day and if you are anything like me then you don't want to spend ages slaving away in the kitchen preparing something delicious.

If you are looking for a simple, healthy, yet quick recipe then this is the one to go for. A wonderful fresh and sweet pizza which is; lets put it my way 'overwhelmingly scrumptious' you will be wanting to make more for sure !

Tomato and Rocket Pizza with olive tapenade 

100g Sweet Vine Tomatoes, halved
1 Pizza Base
2-3 tbsp Olive and Sun-dried Tomato Tapenade
1/2 small red onion, finely sliced
125g mozzarella, torn into pieces
1 tbsp olive oil
Handful of wild rocket
Shavings of Parmigiano Reggiano, to serve
Extra virgin olive oil, to drizzle

First preheat the oven to 170c, gas mark 3. Place the tomatoes on a baking sheet and cook until softened and starting to dry, but not browned (about 20 minutes).

After having taken the tomatoes out of the oven increase the temperature to 220c, gas mark 7. Place the pizza base onto a baking sheet and spread the tapenade over the base leaving a border around the edge, then add the tomatoes, onion and mozzarella. Drizzle with olive oil.

Bake for roughly 8-10 minutes until the top is golden and bubbling and the base is crisp. Serve scattered with the parmigiano reggiano and rocket, drizzled with extra virgin olive oil.

I would suggest that you serve the pizza with a goats cheese and sun-dried tomato salad with honey dressing to add to the pizza's sweetness oh and don't forget a dashing of sea salt. This really worked for me in fact I am seriously craving more right now.

Full credit goes to Waitrose for another amazing recipe.

Love Chrissi xo

Wednesday, August 22, 2012

Weddings and details ...


There are weddings here in the UK that are seriously not my style in fact they are so old school, so blah and boring that I really want to scream. I know that the UK is really starting to catch on with the likes of US style weddings, which makes me super happy, but why are we still so far behind ?

I don't want to seem rude or anything, but are there any other fellow Brits reading this that would agree ?  I mean look at the Americans, the French, the Spanish, now they know how to throw a real wedding. Look at the fun games, the small details that turn a hey ok wedding into spectacular event.

I am ALL for details and fun, they make me wanna jump with excitement. One of the reasons I believe I excel at planning parties is simply because I love to concentrate on the mini additions, which really bring a table arrangement to life.


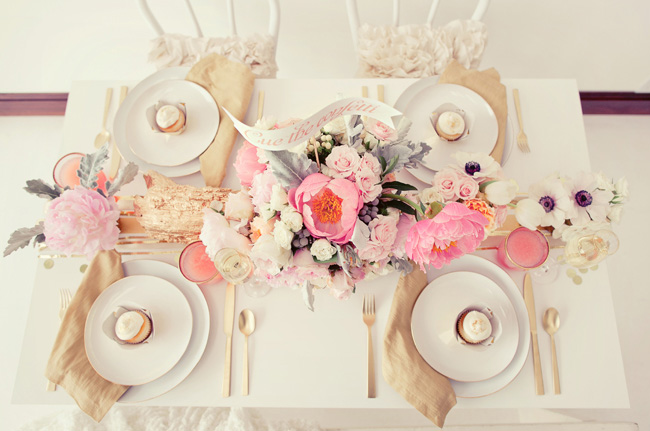
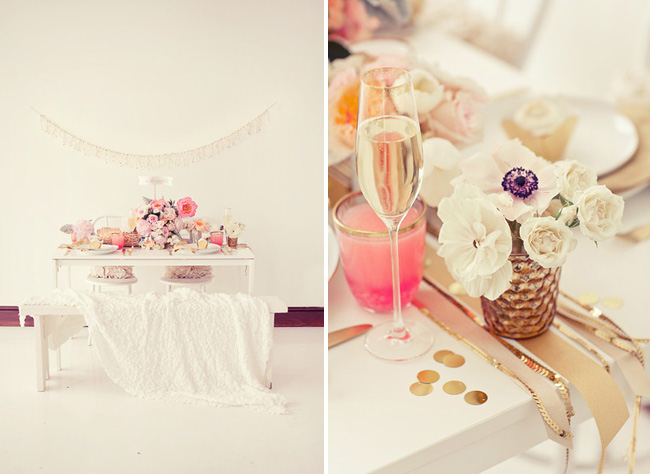
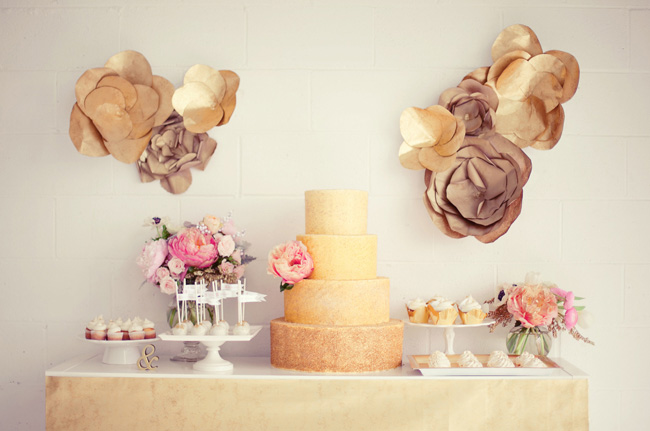
For one I love this photo shoot first shown by Green Wedding Shoes. Look at how beautiful it is with it's white, gold and pink accents. I love the golden log to hold the florals, the white backdrop, the pink peonies, the gold cutlery, the confetti, the sweet paper flowers on the wall. So eye catching wouldn't you agree ?


Well we can all have this and it needn't be expensive. You can make a lot of these things yourself. You just need to have the time and the patience and if you look on google and research wedding games there are tons of ideas out there.

If you are in the process of wedding planning would you mind if I really encouraged you to think about such details ? I promise that they would definitely turn your wedding into a truly fantastic union certainly worth remembering forever.

Learn how to make yourself some table runners, ribbon garlands, floral arrangements, paper flowers, pom poms, your own seating charts, homemade wedding favours. The list is endless, but not impossible. Go on give it a try !

For more inspiration please visit my inspirational boards over on pinterest here.

Love Chrissi xx

Tuesday, August 14, 2012

Tents, tents galore ....

Hey there ! First off let me apologise for the lack of communication, only my family and I have been away in sunny Greece and have also spent some time doing some much needed DIY in our flat (about time). It's still not finished and there is so much to do, which is frustrating cause all this painting business is boring me I just want to get down to the interiors !

Anyway, on a side note. I think I am in love with the idea of this tent:


(source: castillero)

The tent was made by the lovely Tori Hendrix from Sitting in a Tree. It is so sweet. I am in love !

Perfect, perfect, perfect for the babes when out in the sunshine. Can't find enough shade then just make yourself a tent. You can easily customise the tent as they get older adding colour, as you go along, lace, pom poms, curtains and fairy lights etc ...

Oh why don't I have an excuse to make one of these now. Would it be too early to make one before even planning a baby ?! 

If your heart screams with joy for these cute little things as much as mine is right now then may I suggest visiting Grosgrain for a tutorial on how to make one !


Love Chrissi xx